


|
|
Using a drill |

Classic drill
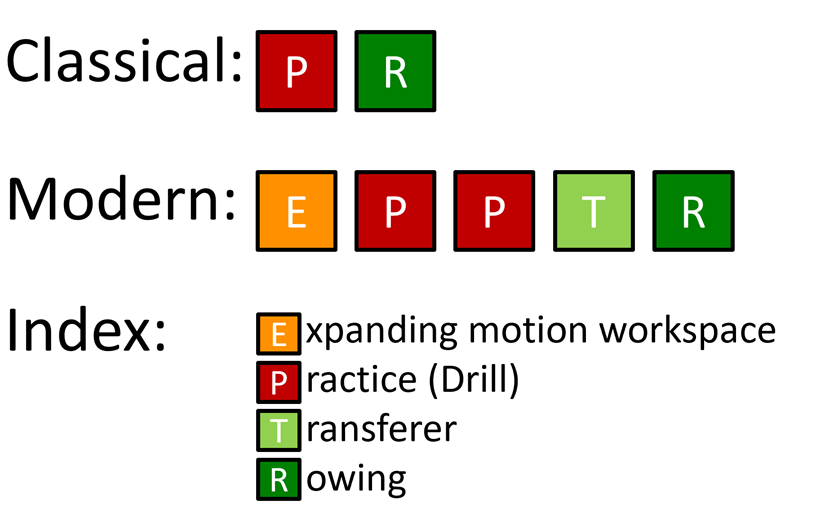
By definition, a classic drill has little impact on the final drive. It changes the drive minimally or not at all. This is clearly explained in this  types of drills article. Therefore, it is better to use a modern (Cybernetic or Motor skill) drill.
Cybernetic/Motor skill drill with the three-step intervention
Modern drills that make use of a cybernetic or motor skill approach prove to be far more effective than classic drills. Furthermore, using a structured step-by-step plan (the intervention protocol), rather than simply announcing the drill, enhances this effectiveness even more. In this step-by-step plan developed by  Jeroen Brinkman, three steps are used.
Step 1 – Explaining (three-legged stool)
Naturally, explaining the drill is essential. Think of it as a three-legged stool: all three legs are important. The three legs of a drill are as follows:
- the drill: what exactly the rower needs to do (what specifically);
- the motivation: why this drill was chosen and what makes it important (legitimization);
- the focus: what the rower should monitor (hearing, seeing, or feeling) while performing this drill (Pay attention to…).
For all  drills in this app, the corresponding objective and focus are provided alongside the description.
Step 2 – Monitoring (practicing)
When the rower executes the drill, it is important to monitor and guide the proper execution. This is done with supportive feedback: helping the rower perform the drill correctly. This is certainly not the time for long explanations, as the rower needs all their concentration to perform the drill well. The feedback should be short, concise, and only address what the rower is doing right now. For example: “Richard, finish higher…”, or continuous stroke-by-stroke quality feedback: “*off, off, almost, good, off, good…*”
Step 3 – Transferring
Finally comes transferring the learned skill to the regular stroke movement (transfer). After all, you don't do the drill for nothing. This is usually accomplished by rowing a stretch with the same focus used during the execution of the drill. Some drills have a specific transfer. For these drills, that transfer is explicitly stated. Supportive feedback is also necessary during the transfer to help the rower apply what they have learned in practice.
Motor experience
Combinations—a series of different techniques sharing the same objective—prove to be much more effective than individual drills or cues. The coach begins by expanding the range of movement. This is followed by a series of modern drills incorporating focus. Ultimately, this is transferred to the regular stroke. This is called a motor experience.
Ergo learning process
The final option is to use the Ergo learning process on the rowing ergometer or in the rowing tank. This also utilizes an intervention protocol developed by Jeroen Brinkman and techniques from motor skill coaching. Correcting movement errors is primarily done in the rowing tank (handle path and/or blade work) or on the ergometer. To teach the correct movement and unlearn the fault using the Ergo learning process, it is essential to always complete all five steps:
- label
- error
- motivate
- correct
- focus
The order of these steps is less critical. They are explained below.
Step 1 – label (the improvement)
Give the error or improvement a clear name. Not “You're not rowing well”, but “You're rushing your seat”. Or—even better—a positively phrased label: “Engage your trunk”.
Step 2 – (experience the) error
Let the rower feel and see what is going wrong. Have them feel, experience, and exaggerate the error. If necessary, demonstrate the error yourself in an exaggerated manner. Use tactile physical guidance if needed to help the rower feel the error. The goal here is not to explain the error, but to make the rower aware of it. (Re)cognition of the error by the rower is key.
Step 3 – motivate (the improvement)
Explain why what the rower is doing is incorrect and the negative consequences of this fault, or why the improvement contributes to boat speed, rowing enjoyment, or injury prevention. Under the rowing errors menu, the motivation is provided under the heading “Consequence”.
Step 4 – correct (rowing)
Ensure that the rower is able to execute the proper rowing movement. Physical guidance—such as guiding the handle, lowering the shoulders, or holding back the trunk—is an effective way to let the rower feel the correct movement. Always ask for permission before touching the rower and announce tactile feedback beforehand. Always confirm when the rower makes the correct movement: “That's it, well done!” This is an essential part of the learning process. Under the rowing errors menu, this guidance is provided under the heading “Remedy”.
Step 5 – (provide the) focus
Teach the rower how to get feedback on their own faulty or correct rowing movement. This is called providing focus. The rower can do this by watching (visual), feeling (kinesthetic), or listening (auditory). For example: you can hear if the rowing rhythm is right. You can feel if the slide is smooth. You can see proper blade extraction. This way, the rower can monitor themselves because they know how to get feedback on their own movement. This feedback can be aimed at recognizing the fault or recognizing the correct movement, depending on what works best. Ask the rower: “*How can you see, hear, or feel that you are doing it correctly right now?*”. If the rower shows a preference (e.g., feeling the fault rather than seeing it), follow that preference—provided, of course, that it is a effective way to receive feedback. Under the rowing errors menu, instructions on how the rower can receive feedback are given under the heading “Focus”.
When the coach/instructor gives a cue to the rower, it is best done using the labels previously established during the Ergo learning process. For example: “*Kees, remember the connection!*” or "*Kees, check your extraction!*". The rower (Kees) now knows what he is doing wrong, what to improve, and how to get self-feedback on this error. Always give positive feedback when the rower acts on your cue: "*Kees, good!*"
 |
Types of drills |
 |
Providing guidance |
This article was translated automatically and is provided to you for free. You are most welcome to improve it!